
처음 책을 보고 따라만들어서 jwt토큰 관련 구현이 이상함
문제1. 사용중인 jjwt라이브러리가 옛날 버전이다.
implementation 'io.jsonwebtoken:jjwt:0.9.1'를 사용했었는데
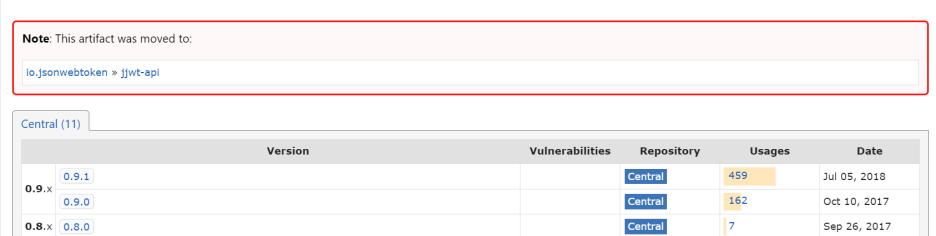
마지막 버전이 2018년이고 jjwt-api로 바뀌었으며 바뀐 라이브러리에서는 이전에 사용하던 일부 메서드들이 deprecated 된듯 하다

문제2. 토큰 생성,검증 등 관련 기능이 jwtUtil(provider) 안에 모두 모여있지 않고 검증부분 일부가 filter내부에 떨어져있음 -> 재사용이 힘들어졌음
- TokenCheckFilter
@RequiredArgsConstructor
public class TokenCheckFilter extends OncePerRequestFilter {  //토큰 검증 후 정보 contextHolder에 등록
    private final JWTUtil jwtUtil;
    private final CustomUserDetailsService userDetailsService;
    private final String[] whiteList;
    @Override
    protected void doFilterInternal(HttpServletRequest request, HttpServletResponse response, FilterChain filterChain) throws ServletException, IOException {
        String path = request.getRequestURI();

        AntPathMatcher antPathMatcher = new AntPathMatcher();
        for(String list : whiteList){
            if(antPathMatcher.match(list,path)){
                log.info("pass token filter .....");
                filterChain.doFilter(request, response);
                return;
            }
        }

        log.info("Token Check Filter.....................");
        log.info("JWTUtil: "+jwtUtil);
        try{
            Map<String,Object> payload = validateAccessToken(request);
            //memberId
            String memberId = (String)payload.get("memberId");
            log.info("memberId: "+memberId);
            UserDetails userDetails = userDetailsService.loadUserByUsername(memberId);
            UsernamePasswordAuthenticationToken authentication = new UsernamePasswordAuthenticationToken(
                    userDetails,null,userDetails.getAuthorities()
            );
            SecurityContextHolder.getContext().setAuthentication(authentication);

            filterChain.doFilter(request,response);
        }catch (AccessTokenException accessTokenException){
            accessTokenException.sendResponseError(response);
        }
    }

    private Map<String, Object> validateAccessToken(HttpServletRequest request) throws AccessTokenException {  //토큰검증

        String headerStr = request.getHeader("Authorization");

        if(headerStr == null  || headerStr.length() < 8){
            throw new AccessTokenException(JWT_UNACCEPT);
        }

        //Bearer 생략
        String tokenType = headerStr.substring(0,6);
        String tokenStr =  headerStr.substring(7);

        if(tokenType.equalsIgnoreCase("Bearer") == false){
            throw new AccessTokenException(JWT_BADTYPE);
        }

        try{
            Map<String, Object> values = jwtUtil.validateToken(tokenStr);  //토큰 파싱

            return values;
        }catch(MalformedJwtException malformedJwtException){
            log.error("MalformedJwtException----------------------");
            throw new AccessTokenException(JWT_MALFORM);
        }catch(ExpiredJwtException expiredJwtException){
            log.error("ExpiredJwtException----------------------");
            throw new AccessTokenException(JWT_EXPIRED);
        }
    }
}
문제3. 토큰내부에 권한정보를 함께 저장하지 않아서 authentication을 만들때 쿼리를 통해 권한이 포함된 유저정보를 다시 가져옴 -> 불필요한 쿼리작업으로 효율 떨어짐
            Map<String,Object> payload = validateAccessToken(request);
            //memberId
            String memberId = (String)payload.get("memberId");
            log.info("memberId: "+memberId);
            UserDetails userDetails = userDetailsService.loadUserByUsername(memberId);
            UsernamePasswordAuthenticationToken authentication = new UsernamePasswordAuthenticationToken(
                    userDetails,null,userDetails.getAuthorities()
            );
문제4. 큰 문제는 아니지만 기존코드에서 tokenCheckFilter에서 토큰검사 과정을 예외처리했는데 이렇게하니 토큰이 필요없는 요청경로에 대한 검사과정을 securityConfig에 permitAll을 해줘도 필터 내부에서 또 체크해줘야 했다. 같은 내용을 두번 적어주는 느낌이라 이 부분도 고치고 싶었다.
- tokenCheckFilter
..
    @Override
    protected void doFilterInternal(HttpServletRequest request, HttpServletResponse response, FilterChain filterChain) throws ServletException, IOException {
        String path = request.getRequestURI();

        AntPathMatcher antPathMatcher = new AntPathMatcher();
        for(String list : whiteList){
            if(antPathMatcher.match(list,path)){
                log.info("pass token filter .....");
                filterChain.doFilter(request, response);
                return;
            }
        }
        // 1. Request Header 에서 JWT 토큰 추출
        String token = resolveToken(request);
..

    private Map<String, Object> validateAccessToken(HttpServletRequest request) throws AccessTokenException {  //토큰검증

        String headerStr = request.getHeader("Authorization");

        if(headerStr == null  || headerStr.length() < 8){
            throw new AccessTokenException(JWT_UNACCEPT);
        }

        //Bearer 생략
        String tokenType = headerStr.substring(0,6);
        String tokenStr =  headerStr.substring(7);

        if(tokenType.equalsIgnoreCase("Bearer") == false){
            throw new AccessTokenException(JWT_BADTYPE);
        }

        try{
            Map<String, Object> values = jwtUtil.validateToken(tokenStr);  //토큰 파싱

            return values;
        }catch(MalformedJwtException malformedJwtException){
            log.error("MalformedJwtException----------------------");
            throw new AccessTokenException(JWT_MALFORM);
        }catch(ExpiredJwtException expiredJwtException){
            log.error("ExpiredJwtException----------------------");
            throw new AccessTokenException(JWT_EXPIRED);
        }
    }
..- securityConfig
..
        http.authorizeRequests()
                .antMatchers(WHITELIST).permitAll()
                .antMatchers("/sample/doB").hasAnyRole("ADMIN")
                .antMatchers("/member/**").hasAnyRole("USER")
                .anyRequest().hasAnyRole("USER")
                .and()
..
이런 문제로 JWTUtil을 리팩토링 했다.
문제1 해결 - 의존성 추가
	implementation 'io.jsonwebtoken:jjwt-api:0.11.5'
	implementation 'io.jsonwebtoken:jjwt-impl:0.11.5'
	implementation 'io.jsonwebtoken:jjwt-jackson:0.11.5'
문제4 해결과정 중..
(해당 부분의 결론은 현상유지이지만 고민하고 공부가 된 내용이 많아 추가했습니다.)
토큰처리 로직을 하나의 유틸로 통합하는 과정은 어려울것 없이 코드의 위치만 옮겨서 조금 수정해주면 됐다.
그런데 문제4 를 해결하는 방법이 고민이었다.
우선 필터 내부에서 경로검사를 하지않고 securityConfig의 설정만으로 처리하려면 필터 내부에서 예외를 반환하지 않고 권한이 없는 authentication을 넘겨야겠다고 생각이 들어서 토큰검사과정에서 true/false를 리턴해주도록 했다.
- JWTUtil
    public boolean validateToken(String token) {
        try {
            Jwts.parserBuilder().setSigningKey(key).build().parseClaimsJws(token);
            return true;
        } catch (io.jsonwebtoken.security.SecurityException | MalformedJwtException e) {
            log.info("Invalid JWT Token", e);
        } catch (ExpiredJwtException e) {
            log.info("Expired JWT Token", e);
        } catch (UnsupportedJwtException e) {
            log.info("Unsupported JWT Token", e);
        } catch (IllegalArgumentException e) {
            log.info("JWT claims string is empty.", e);
        }
        return false;
}- tokenCheckFilter
        String token = resolveToken(request);

        try {
            if (token != null && jwtUtil.validateToken(token)) {
                // 토큰이 유효할 경우 토큰에서 Authentication 객체를 가지고 와서 SecurityContext 에 저장
                Authentication authentication = jwtUtil.getAuthentication(token);
                SecurityContextHolder.getContext().setAuthentication(authentication);
            }
            filterChain.doFilter(request, response);
        }catch (AccessTokenException e){
            e.sendResponseError(response);
        }
토큰이 없거나 문제가 있을 경우 false를 리턴해주어 authentication을 등록하지 않고 다음으로 넘어가게했다.
처음 기대했던 상황은 User사용자가 Admin권한이 필요한 경로로 접근했을 때 권한에러가 발생하는 것처럼,
익명사용자로 넘어가 securityConfig의 antMatchers에서 permitAll은 통과하고 권한이 필요한 경로는 accessDenied로 막히는 상황을 기대했다.
하지만 필터에서 토큰이 없어도 다음 로직으로는 넘어간 뒤의 상황이 기대와는 다르게 동작했다.

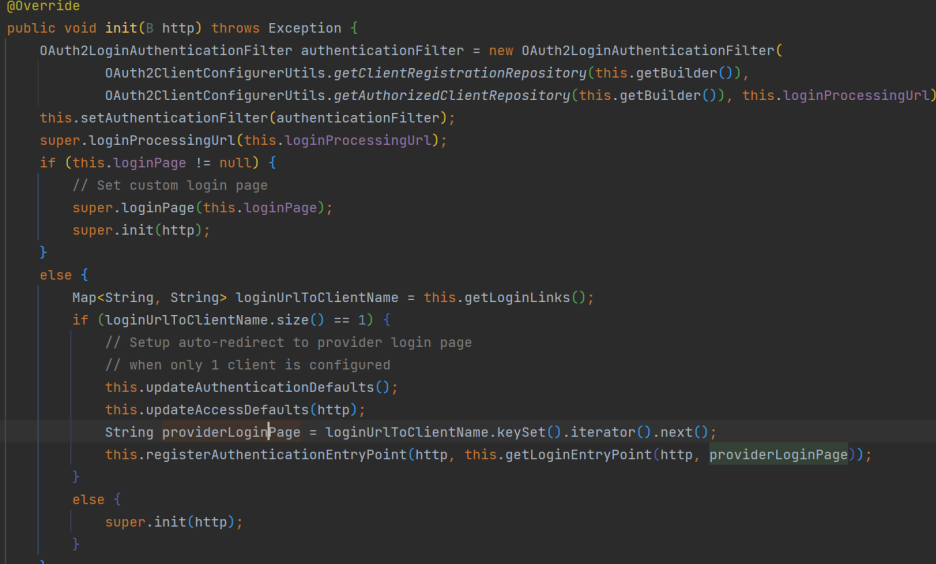
현재 자체로그인 말고도 oauth2를 이용한 소셜로그인도 함께 사용중인데, 소셜로그인을 요청한게 아니라 그저 토큰없이 권한이 필요한 api를 요청했을 뿐인데 소셜로그인을 요청하는 경로로 redirecting 시켜버리는 것이다.
그래서 계속 찾아본결과 익명사용자는 다른 권한이 있는 사용자와는 조금 다르게 동작했다.
스프링 시큐리티는 인증/인가 예외 상황에서 기본적으로 인증예외는 모두 동일하게 AuthenticationEntryPoint로 넘어가지만, 인가 예외에서는 익명 사용자가 아니지만 권한예외가 발생한 경우 AccessDeniedHandler로 가지만, 익명 사용자의 경우 인증이 된건지 아닌지 알 수 없기 때문에 AuthenticationEntryPoint로 넘어간다고 한다.
그렇기 때문에 처음 기대했던 권한에러가 발생하지 않고 예상하지 못한 방식으로 동작했던 것이다.
조금 더 자세히 보기위해 로그에 찍힌 DelegatingAuthenticationEntryPoint 내부를 타고 들어가다보면 아래와 같다.
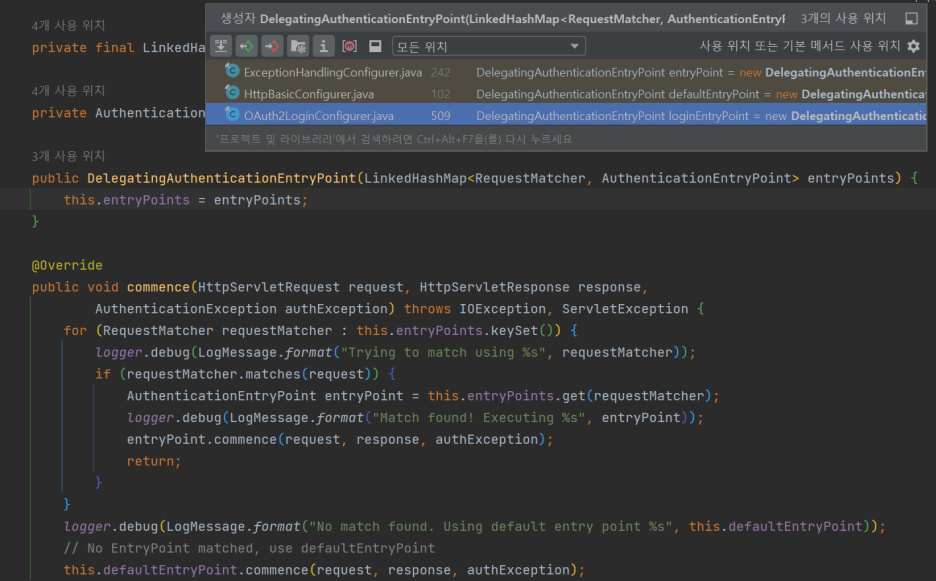
소셜로그인을 위해서 oauth2를 사용하고 있으니 생성자를 Oauth2LoginConfigurer에서 호출할 것이다.
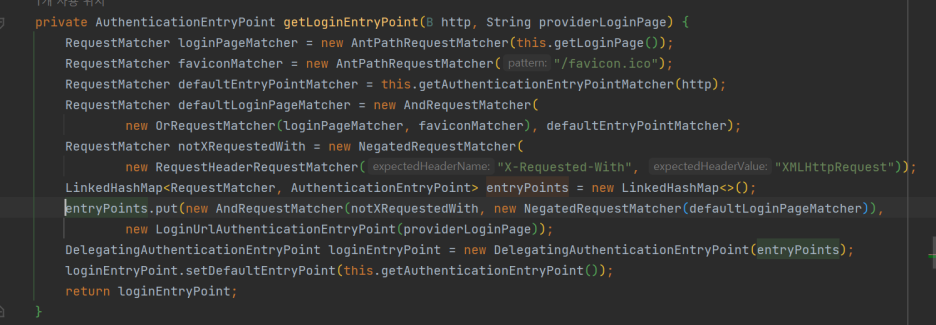
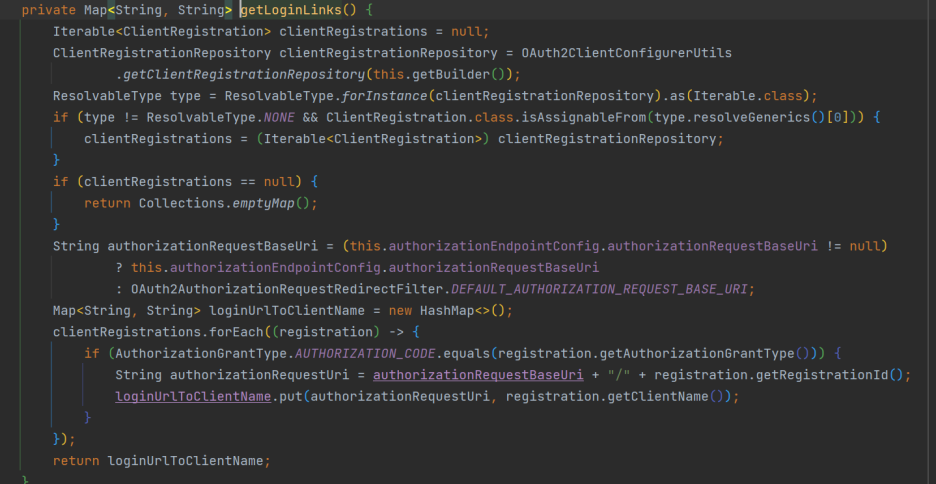
해당 파일 내부에서는 providerLoginPage를 파라미터로 LoginUrlAuthenticationEntryPoint 생성하고 넣어주는데, 해당 파라미터를 추적해보면 getLoginLinks()에서 소셜로그인 요청경로를 생성해주는 것을 볼수있었다.
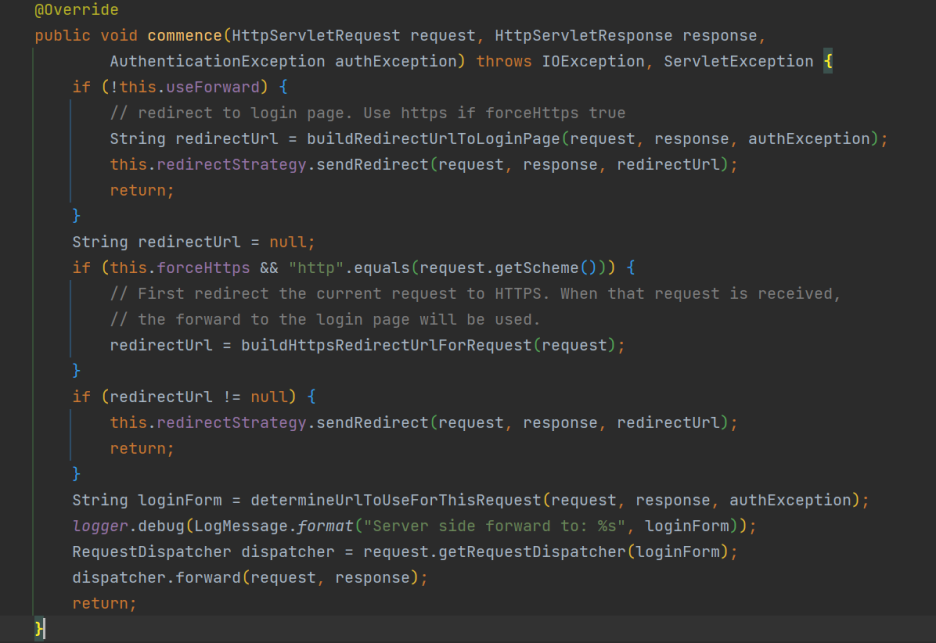
그리고 LoginUrlAuthenticationEntryPoint는 로그인경로로 이동시킨다.
요약하자면 익명사용자로 필터를 통과할 경우 예상처럼 권한에러가 발생하는게 아닌 AuthenticationEntryPoint로 이동하고 로그인 경로로 리다이렉트 시켜준다.
스프링에서 기본 로그인 경로는 /login이지만 oatuh2를 사용하고 있어 소셜로그인 요청 경로가 기본 로그인 경로가 되었고, 해당경로로 리다이렉트 되었다.
(spring,security,oauth2를 이번 프로젝트에서 처음 다루어 동작 과정을 모두 알지 못합니다. 내부 구조가 크고 복잡해 모든 코드를 자세히 보진 못하고 혼자 공부하며 코드를 해석했기 때문에 틀린 부분이 있을 수 있습니다.)
이를 해결하기 위해 찾아본 방법으로는 AuthenticationEntryPoint의 구현체를 만들어서 등록하는 방법이 있었다.
- securityConfig
..
       http.authorizeRequests()
..
                .exceptionHandling().authenticationEntryPoint(authenticationEntryPoint())
..
..

    public AuthenticationEntryPoint authenticationEntryPoint(){
        AuthenticationEntryPoint authenticationEntryPoint = new AuthenticationEntryPoint() {
            @Override
            public void commence(HttpServletRequest request, HttpServletResponse response, AuthenticationException authException) throws IOException, ServletException {
                response.setStatus(401);
                response.setContentType(MediaType.APPLICATION_JSON_VALUE + ";charset=UTF-8");

                final ErrorResponse errorResponse = ErrorResponse.of(JWT_UNACCEPT);
                Gson gson = new Gson();

                try {
                    response.getWriter().println(gson.toJson(errorResponse));
                } catch (IOException e) {
                    throw new RuntimeException(e);
                }
            }
        };
        return authenticationEntryPoint;
    }
( 로그인 경로로 리다이렉트 하지않고 에러를 응답하도록 구현한 코드)
하지만 막상 이렇게 모두 해결하니 토큰 검증과정에서 예외 상황별(토큰이 없는지, 만료인지 등..) 처리를 할 수 없고 모두 false를 리턴해주기만 할 뿐만아니라 이후 익명사용자의 처리가 모두 위의 코드대로만 처리되기 때문에 좋은 방법은 아닌것 같았다.
그래서 결국 토큰 검증은 기존처럼 필터내부에서 예외처리를 해주고 경로체크를 한번더 해주는 방법을 유지하기로 했다.
참고:
https://velog.io/@dailylifecoding/spring-security-anonymous-authentication-filter
ticationentrypoint
문제2 해결 - 토큰 관련 기능을 하나의 util 안에 둔다.
- JWTUtil
package org.whitebox.howlook.global.util;

import io.jsonwebtoken.*;
import io.jsonwebtoken.io.Decoders;
import io.jsonwebtoken.security.Keys;
import lombok.extern.log4j.Log4j2;
import org.springframework.beans.factory.annotation.Value;
import org.springframework.security.authentication.UsernamePasswordAuthenticationToken;
import org.springframework.security.core.Authentication;
import org.springframework.security.core.GrantedAuthority;
import org.springframework.security.core.authority.SimpleGrantedAuthority;
import org.springframework.security.core.userdetails.User;
import org.springframework.security.core.userdetails.UserDetails;
import org.springframework.stereotype.Component;
import org.whitebox.howlook.global.config.security.dto.TokenDTO;
import org.whitebox.howlook.global.config.security.exception.TokenException;
import org.whitebox.howlook.global.error.exception.BusinessException;

import java.security.Key;
import java.time.ZonedDateTime;
import java.util.*;
import java.util.stream.Collectors;

import static org.whitebox.howlook.global.error.ErrorCode.*;

@Component
@Log4j2
public class JWTUtil {
    private Key key;

    public JWTUtil(@Value("${org.whitebox.jwt.secret}") String secretKey) {
        byte[] keyBytes = Decoders.BASE64.decode(secretKey);
        this.key = Keys.hmacShaKeyFor(keyBytes);
    }

    public String generateToken(Authentication authentication) {
        // 권한 가져오기
        String authorities = authentication.getAuthorities().stream()
                .map(GrantedAuthority::getAuthority)
                .collect(Collectors.joining(","));

        long now = (new Date()).getTime();
        // Access Token 생성
        String accessToken = Jwts.builder()
                .setSubject(authentication.getName())
                .claim("auth", authorities)
                .setExpiration(Date.from(ZonedDateTime.now().plusSeconds(10).toInstant()))
                .signWith(key, SignatureAlgorithm.HS256)
                .compact();

        return accessToken;
    }

    public String generateRefreshToken(String username) {
        long now = (new Date()).getTime();
        // Refresh Token 생성
        String refreshToken = Jwts.builder()
                .setSubject(username)
                .setExpiration(Date.from(ZonedDateTime.now().plusDays(30).toInstant()))
                .signWith(key, SignatureAlgorithm.HS256)
                .compact();

        return refreshToken;
    }


    // 토큰의 정보로 Authentication 가져옴
    public Authentication getAuthentication(String accessToken) {
        // 토큰 복호화
        Claims claims = parseClaims(accessToken);

        if (claims.get("auth") == null) {
            throw new TokenException(JWT_INVALID);
        }

        // 클레임에서 권한 정보 가져오기
        Collection<? extends GrantedAuthority> authorities =
                Arrays.stream(claims.get("auth").toString().split(","))
                        .map(SimpleGrantedAuthority::new)
                        .collect(Collectors.toList());
        log.info(authorities);

        // UserDetails 객체를 만들어서 Authentication 리턴
        UserDetails principal = new User(claims.getSubject(), "", authorities);
        return new UsernamePasswordAuthenticationToken(principal, "", authorities);
    }

    // 토큰 정보를 검증하는 메서드
    public boolean validateToken(String token) {
        try {
            Jwts.parserBuilder().setSigningKey(key).build().parseClaimsJws(token);
            return true;
        } catch (io.jsonwebtoken.security.SecurityException | MalformedJwtException e) {
            throw new TokenException(JWT_MALFORM);
        } catch (ExpiredJwtException e) {
            throw new TokenException(JWT_EXPIRED);
        } catch (IllegalArgumentException e) {
            throw new TokenException(JWT_MALFORM);
        }
    }

    // JWT 토큰에 들어있는 정보를 꺼냄
    public Claims parseClaims(String accessToken) {
        try {
            return Jwts.parserBuilder().setSigningKey(key).build().parseClaimsJws(accessToken).getBody();
        } catch (ExpiredJwtException e) {
            return e.getClaims();
        }
    }
}- TokenCheckFilter
    @Override
    protected void doFilterInternal(HttpServletRequest request, HttpServletResponse response, FilterChain filterChain) throws ServletException, IOException {
        String path = request.getRequestURI();

        AntPathMatcher antPathMatcher = new AntPathMatcher();
        for(String list : whiteList){
            if(antPathMatcher.match(list,path)){
                log.info("pass token filter .....");
                filterChain.doFilter(request, response);
                return;
            }
        }

        try {
            // Request Header 에서 JWT 토큰 추출
            String token = resolveToken(request);

            // validateToken 으로 토큰 유효성 검사
            if (jwtUtil.validateToken(token)) {
                // 토큰이 유효할 경우 토큰에서 Authentication 객체를 가지고 와서 SecurityContext 에 저장
                Authentication authentication = jwtUtil.getAuthentication(token);
                SecurityContextHolder.getContext().setAuthentication(authentication);
            }
            filterChain.doFilter(request, response);
        }catch (TokenException e){
            e.sendResponseError(response);
        }
    }
코드 리팩토링이라는게 본인이 아는만큼 할 수 있다보니 아무리 고민을 해도 답답함이 남는다.
심지어 리팩토링 전의 코드가 정말 안좋은 코드가 맞는지, 전보다 후의 코드가 더 좋은게 맞는지도 잘 모르겠는 경우도 많다.
일단 할 수 있는 대로 최대한 지금까지 공부한 지식을 바탕으로 혼자 고민해보고 따져보면서 바꿀뿐이다..
주변에 같이 스프링을 공부하는 친구나 멘토삼을 수 있는 사람이 있었다면 좋을텐데 아쉬움이 남는다.
'Web > Spring' 카테고리의 다른 글
| Oauth2 카카오 소셜로그인 리팩토링 (0) | 2023.07.25 |
|---|---|
| [Spring] JWT refreshToken에 대한 고민, 사용하기(Redis) (0) | 2023.07.25 |
| [Spring] 소켓통신 이용한 채팅 구현하기 5 - 채팅내용 DB저장 (0) | 2023.07.21 |
| [Spring] 소켓통신 이용한 채팅 구현하기 4 - 채팅방 DB저장 (0) | 2023.07.21 |
| [Spring] 소켓통신 이용한 채팅 구현하기 3 - RabbitMQ 연동 (2) | 2023.07.21 |

